
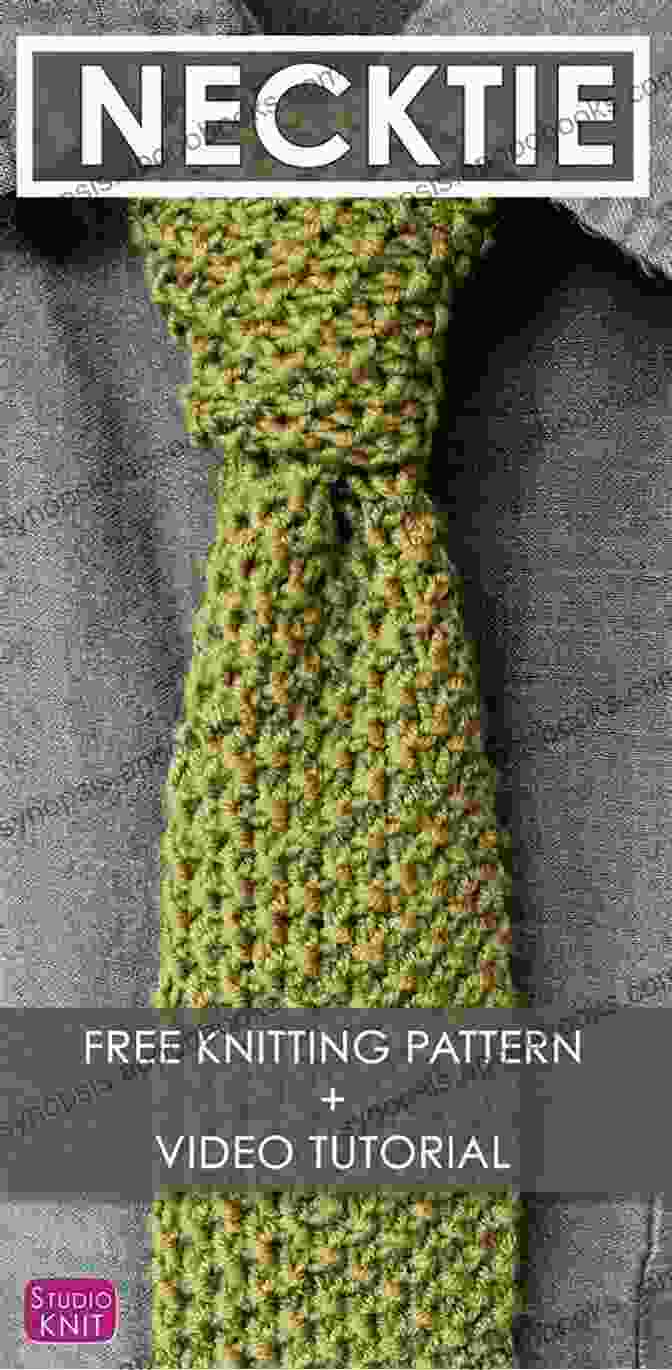
How to Knit a Tie: A Comprehensive Guide to Crafting a Vintage Striped Masterpiece

In the realm of sartorial elegance, few accessories can rival the timeless allure of a well-crafted necktie. Its ability to instantly elevate an ensemble, adding a touch of sophistication and refinement, has made it a staple in the wardrobes of discerning individuals for centuries.

5 out of 5
| Language | : | English |
| File size | : | 80 KB |
| Text-to-Speech | : | Enabled |
| Screen Reader | : | Supported |
| Enhanced typesetting | : | Enabled |
| Print length | : | 5 pages |
| Lending | : | Enabled |
If you're looking to add a unique and personal touch to your wardrobe, or are seeking a thoughtful handmade gift for a special someone, why not embark on the rewarding journey of creating your own knitted tie? With our comprehensive guide, you'll discover every step involved in knitting a beautiful vintage-inspired striped tie, from selecting the perfect yarn to mastering intricate patterns. Whether you're a seasoned knitter or just starting your adventure with yarn and needles, we'll guide you through the process with clarity and ease.
Chapter 1: Choosing the Perfect Yarn
The foundation of any knitted masterpiece lies in the yarn you choose. When it comes to crafting a durable and visually appealing tie, the type of yarn you select plays a crucial role. Here are some key considerations to keep in mind:
- Fiber Content: For a vintage aesthetic, consider using a blend of natural fibers such as wool, silk, or cotton. These fibers offer excellent durability, breathability, and a luxurious feel.
- Weight: Opt for a medium-weight yarn that will provide both structure and drape. Avoid using very lightweight yarns as they may result in a flimsy tie, or excessively heavy yarns that can be bulky and uncomfortable to wear.
- Color and Pattern: Choose a yarn in a color or pattern that complements your wardrobe and personal style. Consider the occasion you intend to wear the tie for and select colors and patterns accordingly.

Chapter 2: The Basic Stitch and Casting On
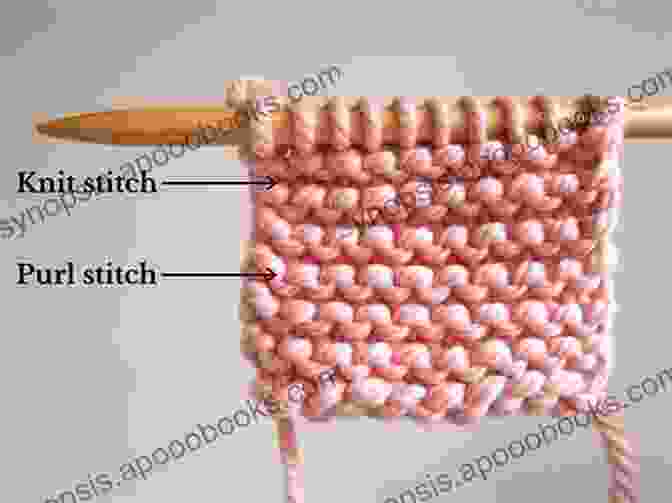
Before delving into the intricacies of knitting a tie, it's essential to master the fundamental stitch: the knit stitch. This basic building block forms the foundation of all knitted fabrics and is surprisingly easy to learn. Here's a step-by-step guide:
- Hold the Needles: Hold one needle in your right hand and the other in your left hand, with the working yarn attached to the left-hand needle.
- Insert the Right-Hand Needle: Insert the tip of the right-hand needle into the next stitch on the left-hand needle, from front to back.
- Hook the Yarn: Use the right-hand needle to hook the working yarn from behind.
- Pull the Yarn Through: Pull the hooked yarn through the loop on the left-hand needle.
- Transfer the Stitch: Slide the newly created stitch onto the right-hand needle.
To cast on, simply create a slip knot and place it on the left-hand needle. Hold the yarn tail in your left hand and use the right-hand needle to knit into the slip knot, as described above. Repeat this process until you have the desired number of stitches on the needle.
Chapter 3: Knitting the Necktie
Now for the fun part! To knit the necktie, you'll combine the basic knit stitch with strategic increases and decreases to shape the tie. Here's a detailed breakdown:
The Blade: Begin by knitting a rectangular section, known as the blade, in a solid color or pattern. Cast on a multiple of 4 stitches plus 2 for the edge stitches.
The Point: To create the pointed end of the tie, gradually decrease the number of stitches by knitting two stitches together at regular intervals.
The Wide End: Next, knit a wider section to form the wide end of the tie. Cast on additional stitches and continue knitting in a solid color or pattern.
The Tail: To finish, knit a long, narrow tail that will extend beyond the wide end. Gradually decrease the number of stitches until you have only a few remaining.

Chapter 4: Adding Stripes
To create the classic striped pattern, you'll simply alternate colors of yarn as you knit. Here are a few tips:
Plan Your Stripes: Before starting, decide on the width and Free Download of your stripes. Sketch out a diagram if necessary.
Change Colors Smoothly: To avoid creating visible gaps or ridges, change colors by knitting the last two stitches of the previous color together with the first two stitches of the new color.
Secure Loose Ends: As you change colors, weave in any loose ends to prevent unraveling.
Chapter 5: Finishing Touches
Once your tie is complete, there are a few finishing touches to give it a professional and polished look:
Blocking: This process helps to even out the stitches and give the tie its final shape. Soak the tie in lukewarm water, gently squeeze out excess water, and then lay it flat on a towel to dry.
Sewing the Lining: For added durability and structure, consider sewing a lining to the inside of the tie.
Attaching the Tie Bar: If desired, you can attach a tie bar to the back of the tie for a secure fit.

Congratulations on embarking on the rewarding journey of knitting your own vintage striped tie! With careful attention to yarn selection, basic knitting techniques, and finishing touches, you've created a unique and timeless accessory that will elevate your wardrobe and turn heads wherever you go. Whether you're a seasoned knitter or a beginner, we hope this guide has empowered you to create a masterpiece that will be cherished for years to come.
As you continue your knitting adventures, don't be afraid to experiment with different colors, patterns, and techniques. The world of knitting is filled with endless possibilities, and with each new project, you'll refine your skills and expand your creative horizons.
Share your creations with pride, inspire others, and continue to discover the joy and satisfaction that comes from the art of knitting.
5 out of 5
| Language | : | English |
| File size | : | 80 KB |
| Text-to-Speech | : | Enabled |
| Screen Reader | : | Supported |
| Enhanced typesetting | : | Enabled |
| Print length | : | 5 pages |
| Lending | : | Enabled |
Do you want to contribute by writing guest posts on this blog?
Please contact us and send us a resume of previous articles that you have written.
 Book
Book Novel
Novel Page
Page Chapter
 Text
Text Story
Story Genre
Genre Reader
 Library
 Paperback
 E-book
 Magazine
 Newspaper
 Paragraph
 Sentence
 Bookmark
 Shelf
Shelf Glossary
 Bibliography
 Foreword
 Preface
 Synopsis
 Annotation
 Footnote
 Manuscript
 Scroll
 Codex
Codex Tome
Tome Bestseller
 Classics
 Library card
 Narrative
 Biography
 Autobiography
 Memoir
 Reference
 Encyclopedia
 Michael J Graetz
 V C Andrews
 Thorstein Veblen
 Diane Brady
 Ken Schoolland
 Corey Brettschneider
 Dan Brodsky Chenfeld
 Craig Brackenridge
 Hugh Macdonald
 Richie Richards
 Diane Alber
 Cynthia Go
 D M Davis
 Colin James
 Patricia Bracewell
 Rk Munin
 Damion Hunter
 Krys Maki
 Colm Keena
 Jayne Ann Krentz
Light bulbAdvertise smarter! Our strategic ad space ensures maximum exposure. Reserve your spot today!


 Reginald CoxUnveiling the Haunting History of the Hebrides in Wartime: A Literary Journey...
 William FaulknerElevate Your Violin Duets to Celestial Heights with "Best of Mozart for...
 Fernando PessoaLiving In Truth At Time Of Universal Deceit: Uncover the Hidden Agendas and...
 Corey GreenFollow ·15.2k
 Gene PowellFollow ·13k
 D'Angelo CarterFollow ·5k
 David PetersonFollow ·18.8k
 Isaiah PriceFollow ·6.7k
 Ismael HayesFollow ·19.1k
 Ralph EllisonFollow ·16.8k
 Jayden CoxFollow ·4.5k

 Cooper Bell
Kids Rule Box Office Hits for the Elementary Player
Empowering Young Performers:...

 Gabriel Blair
Unraveling the Enigma: Political Alienation and Its...
In the labyrinthine tapestry of human...

 Anthony Burgess
Be a Great Singer: Unleash Your Musical Talent with...
Do you dream of singing with...

 Heath Powell
Dive into a Musical Masterpiece: "10 for 10 Sheet Music...
An Enchanting Journey Through Broadway...

 Guy Powell
Universal Rights, Systemic Violations, and Cultural...
The notion of universal human rights is a...

 Miguel Nelson
5 out of 5
| Language | : | English |
| File size | : | 80 KB |
| Text-to-Speech | : | Enabled |
| Screen Reader | : | Supported |
| Enhanced typesetting | : | Enabled |
| Print length | : | 5 pages |
| Lending | : | Enabled |
